


Across generations, leather has remained a favored material for crafting diverse goods due to its enduring nature and timeless appeal. Its inherent durability and flexibility make it easily malleable for intricate designs and engravings. The art of leather engraving has been a tradition handed down through ancestral lines.
The landscape of leather engraving has undergone evolution with technological progress. This blog endeavors to spotlight top 9 techniques to engrave leather today, and you'll learn all the tools and tips for each technique.

In this article:
- Part 1: How to Laser Engrave Leather
- Part 2: How to Engrave Leather by Hand
- Part 3: How to Engrave Leather with A Dremel
- Part 4: How to Engrave Leather with Cricut Machine
- Part 5: Engrave Leather for Branding
- Part 6: Engrave Leather with Pyrography
- Part 7: Engrave Leather through Embossing
- Part 8: Engrave Leather through Perforation
- Part 9: Engrave Leather with Embroidery
- FAQs About Leather Engraving
Part 1: How to Laser Engrave Leather
Laser engraving on leather has revolutionized the art of crafting leather goods, offering precision, intricacy, and customization previously unattainable through traditional methods. Utilizing laser technology, this technique allows for detailed designs, patterns, and text to be etched onto leather surfaces with high accuracy and speed. Whether for personalization, branding, or artistic expression, laser engraving on leather has gained popularity across various industries.


Tools Required for Laser Engraving on Leather:
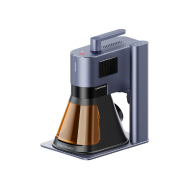
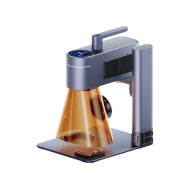
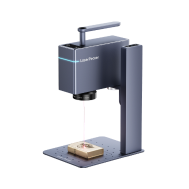
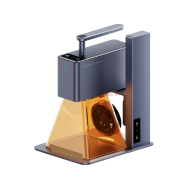
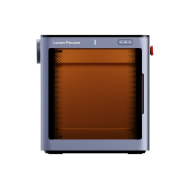
- Leather Laser Engraving Machine: The mini laser engraving machine such as LaserPecker LP4 can meet your need and it's controlled by software, allowing precise leather laser engraving.
- Leather Material: Different types and thicknesses of leather materials can be used for engraving, such as full-grain, top-grain, or suede.
- Design Software: Design software controlling laser engraver like LaserPecker Design Space is essential to create or import the artwork to be engraved onto the leather.
- Safety Gear: Remember to use LaserPecker safety goggles and protective equipment to protect against laser exposure and leather debris.
Tips for Laser Engraving on Leather:
- Choose Suitable Leather: Select leather types that are compatible with laser engraving and ensure they are properly conditioned to achieve the best results.
- Leather Surface Preparation: Clean the leather surface thoroughly before engraving to remove dust, oils, or residues that might affect the engraving quality.
- Test Laser Engraving Settings: Conduct test engravings on a small piece of leather to adjust laser settings for optimal depth, speed, and power without damaging the material. For more info, please check our LaserPecker Craftzone.
- Design Considerations: Create or select designs with appropriate contrast and detail to ensure clear and visually appealing engravings.
- Experiment and Practice: Familiarize yourself with the laser engraving process by experimenting with different settings and practicing on scrap pieces of leather to enhance your skills and techniques.
Video Guide on Laser Engraving on Leather:
Part 2: How to Engrave Leather by Hand
Hand-carving leather is a traditional technique that involves the meticulous art of cutting, shaping, and engraving designs or patterns into leather surfaces. This method allows artisans to create intricate and personalized details, adding depth and texture to leather goods. Hand-carving on leather requires skillful manipulation of tools to achieve precise and visually captivating engravings, making it a cherished craft in the realm of leatherwork.
Tools Required for Hand-Carving to Engrave Leather:
- Swivel Knife: A specialized knife with a rotating blade that allows for controlled and curved cuts on the leather.
- Leather Stamps: Various stamps or modeling tools with different shapes and sizes for creating specific designs and textures.
- Cutting Mat or Surface: A protective surface to work on and prevent damage to the tools and work area.
- Beveling Tools: Tools for beveling or rounding the edges of the carved design, adding depth and definition.
- Mallet: A mallet is used to strike the stamps or tools onto the leather with the appropriate force for engraving.
Tips for Hand-Carving to Engrave Leather:
- Master Knife Control: Practice and develop precise control over the swivel knife to create smooth and consistent cuts, controlling depth and direction for intricate designs.
- Experiment with Pressure: Vary the pressure applied with the stamps or modeling tools to achieve different depths and textures, enhancing the visual appeal of the engraved design.
- Plan and Sketch: Sketch or outline the design on the leather surface before carving to ensure proper spacing, alignment, and overall aesthetics of the finished engraving.
- Work in Sections: Carve the design in sections, working gradually to maintain focus and accuracy, ensuring uniformity throughout the process.
- Patience and Practice: Hand-carving on leather demands patience and practice to refine techniques and develop craftsmanship, allowing for the creation of detailed and refined engravings.
Video Guide on Engraving Leather by Hand:
Part 3: How to Engrave Leather with A Dremel
Engraving leather with a Dremel tool involves using a rotary tool equipped with various attachments to create designs, patterns, or text on leather surfaces. This method offers precision and versatility, allowing artisans to etch intricate details or custom designs onto leather items. Engraving with a Dremel requires careful control and technique to achieve desired engraving depths and designs without damaging the leather.
Tools Required for Engraving Leather with a Dremel:
- Dremel Rotary Tool: A handheld rotary tool with variable speed settings and different attachments suitable for engraving on leather.
- Engraving Bits: Various engraving bits or attachments designed for use with the Dremel for cutting or engraving on leather.
- Safety Gear: Safety glasses or goggles to protect eyes from debris generated during the engraving process.
- Work Surface: A stable and secure work surface to hold the leather item in place during engraving.
Tips for Engraving Leather with a Dremel:
- Experiment with Speed and Pressure: Adjust the speed settings on the Dremel and practice varying pressure to find the right combination for achieving desired engraving depths without cutting too deeply into the leather.
- Use Stencils or Guides: Consider using stencils or guides to trace or outline designs on the leather surface before engraving, ensuring more precise and consistent results.
- Work Methodically: Engrave in sections, moving slowly and steadily across the leather surface to maintain evenness and avoid inconsistencies in the engraving.
- Clean and Protect the Leather: After engraving, clean the leather surface to remove any debris or dust. Consider applying a leather conditioner or protective finish to preserve the engraved design and the leather's integrity.
Video Guide on Engraving Leather with A Dremel:
Part 4: How to Engrave Leather with Cricut Machine
Engraving leather using a Cricut machine involves utilizing this cutting-edge electronic cutting tool equipped with specialized engraving tips or blades to etch designs, patterns, or text onto leather surfaces. The Cricut machine, known for its precision and versatility in crafting, offers a modern and precise method for engraving intricate designs on leather items. This technique allows for personalized and detailed engravings, adding a unique touch to leather-based projects.
Tools Required for Engraving Leather with Cricut:
- Cricut Machine: An electronic cutting machine capable of engraving with compatible engraving tips or blades.
- Engraving Tips or Blades: Specialized tips or blades specifically designed for engraving on leather with the Cricut machine.
- Design Software: Utilize design software compatible with the Cricut machine to create or import designs for engraving onto the leather.
Tips for Engraving Leather with Cricut:
- Choose the Right Leather: Ensure the leather chosen for engraving is compatible with the Cricut machine and its engraving capabilities, considering the thickness and texture of the leather.
- Prepare the Design: Use design software compatible with the Cricut machine to create or customize designs specifically tailored for engraving onto leather surfaces.
- Test Settings and Materials: Conduct test engravings on scrap pieces of leather using the Cricut machine to fine-tune settings for optimal depth, speed, and pressure without damaging the material.
- Secure the Leather: Ensure the leather is properly secured onto the cutting mat or platform of the Cricut machine to prevent shifting or movement during the engraving process.
- Clean and Finish: Once engraving is complete, clean the leather surface to remove any residue or debris. Consider conditioning or finishing the leather to protect the engraved design and enhance its appearance.
Video Guide on Engraving Leather with Cricut:
Part 5: Engrave Leather for Branding
Engraving leather for branding purposes adds a touch of sophistication and identity to various leather goods. Whether it's for personalizing products, showcasing logos, or adding professional finishing touches, leather branding through engraving offers a durable and elegant way to mark leather items. This technique provides a lasting impression, making the product distinctive and recognizable.
Tools Required for Engraving Leather Branding:
- Branding Iron or Stamp: A custom-made branding iron or stamp with a specific design, logo, or initials for imprinting onto the leather.
- Mallet or Hammer: Used to firmly press the branding iron or stamp onto the leather surface.
- Heat Source: For heated branding irons, a heat source like a gas stove, electric heater, or specialized branding tool.
Tips for Engraving Leather Branding:
- Branding Iron Design Precision: Ensure the branding iron or stamp is crafted with precise details to accurately represent the intended design when imprinted onto the leather.
- Temperature and Pressure: Find the right balance of heat and pressure when using the branding iron or stamp to achieve a clear and consistent brand mark without scorching or damaging the leather.
- Test on Scrap Leather: Before branding the final product, practice on scrap pieces of leather to determine the optimal temperature, pressure, and duration needed for a clean and well-defined imprint.
- Leather Preparation: Condition the leather surface and ensure it is clean and smooth before branding to prevent any irregularities or blemishes on the finished product.
- Positioning and Alignment: Carefully position and align the branding iron or stamp on the leather to ensure a centered and straight imprint, especially for logos or text.
Video Guide on Engraving Leather Branding:
Part 6: Engrave Leather with Pyrography
Engraving leather through pyrography involves the use of controlled heat to create intricate designs, patterns, or text on leather surfaces. This technique, also known as woodburning, offers artists and craftsmen a versatile method to personalize leather items, adding artistic flair and uniqueness. Pyrography on leather allows for the creation of detailed and permanent imprints through the controlled application of heat.
Tools Required for Engraving Leather with Pyrography:
- Pyrography Pen: A specialized tool with interchangeable tips or nibs that heat up to create designs on the leather.
- Design Patterns or Stencils: Templates or patterns for tracing or guiding the pyrography designs onto the leather.
- Heat Control Device: Depending on the pyrography pen, a device to control and adjust the temperature of the pen for different effects and depths of engraving.
Tips for Engraving Leather with Pyrography:
- Practice Heat Control: Familiarize yourself with the heat settings of the pyrography pen by starting with lower temperatures and gradually increasing to achieve the desired engraving depth without burning the leather.
- Test on Scrap Leather: Experiment on a small piece of leather to test different nibs, heat settings, and techniques before working on the final leather item to avoid mistakes or damage.
- Prepare the Leather Surface: Ensure the leather surface is clean, smooth, and free from oils or contaminants before starting the pyrography process to achieve better engraving results.
- Use Pyrography PenLight Pressure: Apply gentle and consistent pressure when using the pyrography pen to avoid cutting or damaging the leather while ensuring a steady and controlled movement for smooth lines and details.
- Plan Design Layout: Sketch or plan the design layout on the leather surface before starting to ensure proper spacing, alignment, and overall aesthetics of the finished engraving.
Video Guide on Engraving Leather with Pyrography:
Part 7: Engrave Leather through Embossing
Leather embossing is a classic technique that involves creating raised or indented designs on leather surfaces, adding texture and visual interest to various leather items. This method, also known as stamping or pressing, utilizes pressure and specialized tools to imprint patterns, logos, or decorative elements onto leather. Embossing leather offers a distinct way to personalize and enhance the aesthetic appeal of leather products.
Tools Required for Engraving Leather through Embossing:
- Embossing Tools: Stamps, rollers, or embossing plates with specific designs or patterns to imprint onto the leather.
- Mallet or Hammer: Used to apply pressure evenly on the embossing tools to create the desired impression on the leather surface.
- Dampening Tool or Spray: To moisten the leather surface slightly, making it more pliable and receptive to embossing.
Tips for Engraving Leather through Embossing:
- Choose the Right Embossing Tool: Select embossing tools that suit the design and size requirements for the leather item, ensuring they are well-crafted to achieve clear and defined imprints.
- Moisturize the Leather: Lightly dampen the leather surface with water or a damp cloth before embossing to make it more flexible, allowing the design to imprint more deeply and evenly.
- Apply Even Pressure: Use a mallet or hammer to exert consistent and even pressure on the embossing tool across the leather surface, ensuring a uniform and well-defined impression.
- Positioning and Alignment: Carefully position and align the embossing tool on the leather to ensure the design is centered and straight for a professional and aesthetically pleasing outcome.
Video Guide on Engraving Leather through Embossing:
Part 8: Engrave Leather through Perforation
Leather perforation involves the creation of small, evenly spaced holes or patterns on leather surfaces. This technique offers a decorative element that not only enhances the aesthetics but also serves functional purposes, allowing for better ventilation or unique design accents in leather products. Perforating leather requires precision and careful execution to achieve desired patterns or designs while maintaining the integrity of the material.
Tools Required for Engraving Leather through Perforation:
- Perforation Tools: Punches, awls, rotary tools with specific tips, or specialized perforating machines designed for creating holes in leather.
- Design Templates or Guides: Patterns or templates to guide the placement and spacing of the perforations on the leather surface.
- Cutting Mat or Surface: A protective cutting surface to prevent damage to the work surface and ensure precise hole creation.
Tips for Engraving Leather through Perforation:
- Choose the Right Perforation Tool: Select perforation tools appropriate for the desired hole size, spacing, and design complexity, ensuring they are sharp and suitable for the leather type.
- Plan and Mark: Sketch or mark the perforation pattern on the leather surface using guides or templates before initiating the perforation process, ensuring accurate spacing and alignment.
- Consistent Pressure and Depth: Apply consistent and controlled pressure when creating perforations to achieve uniform hole size and depth without damaging the leather.
- Use Proper Technique: Maintain a steady hand and work methodically when perforating leather to ensure even spacing and alignment throughout the process, especially for intricate designs.
Video Guide on Engraving Leather through Perforation:
Part 9: Engrave Leather with Embroidery
Embroidering leather involves embellishing leather surfaces with decorative designs, patterns, or motifs using needle and thread. This technique blends the elegance of traditional embroidery with the durability and texture of leather, resulting in intricate and visually appealing embellishments on various leather items. Embroidery on leather adds a touch of artistry and uniqueness, elevating the aesthetic value of leather goods.
Tools Required for Embroidering Leather:
- Leather Needles: Specialized needles designed for sewing through leather without causing damage to the material.
- Embroidery Threads: Threads of various colors and types suitable for embroidery, ensuring they complement the leather's texture and thickness.
- Embroidery Hoop: Used to hold the leather taut and steady while embroidering, maintaining even tension for precise stitching.
- Tracing Tool or Chalk: A tracing tool or chalk for marking the embroidery design or pattern onto the leather surface before stitching.
- Thimble: Protects fingers from the rigors of pushing needles through the tough leather surface while embroidering.
Tips for Embroidering Leather:
- Choose the Right Needle and Thread: Select appropriate leather needles and threads suitable for the leather type and thickness, ensuring they glide smoothly through the material without causing damage.
- Prepare the Leather: Condition the leather surface to soften it slightly, making it more pliable and easier to embroider while maintaining its integrity.
- Test Stitch on Scrap Leather: Practice stitching on a scrap piece of leather to adjust the tension, needle size, and embroidery design before working on the final leather item.
- Secure Stitches Carefully: Make secure and even stitches on the leather surface, ensuring they are neither too tight nor too loose to maintain the integrity of the material.
- Consider Design Placement: Plan the placement and spacing of the embroidery design on the leather surface, considering the item's shape and size for a balanced and visually appealing outcome.
Video Guide on Embroidering Leather:
FAQs About Leather Engraving
1. What types of leather are suitable for engraving?
Various types of leather, such as full-grain, top-grain, vegetable-tanned, or softer leathers, can be used for engraving depending on the desired technique and design.
2. What can I use leather engraving for?
Leather engraving can be used for personalization, branding, decorative purposes, adding details to leather goods like leather wallets, bags, belts, shoes, and for creating unique patterns or designs.
3. Can I engrave leather at home?
Yes, with the right tools and techniques, some leather engraving methods can be done at home. However, certain techniques might require specialized equipment.
4. How to Engrave Leather at Home?
After reading this blog, I believe you have learned some leather engraving methods that you can do at home. Take embossing as an example here.
Wipe down the area of the leather you plan to engrave with a damp sponge. Clamp down your leather to a flat, sturdy surface using the C-clamps. If the stamp can be affixed, do so, align it on the surface of the leather, and strike a few times with the mallet. This will take some practice to determine how much pressure to apply. Repeat to create the pattern or letters you’d like to engrave.
Conclusion
In conclusion, engraving leather is a versatile craft that encompasses various techniques, from traditional hand-carving to modern methods like laser engraving or using tools such as the Dremel or Cricut machines. Techniques like embossing, perforation, embroidery, and different engraving methods enable artisans to add depth, texture, and personalization to leather products, transforming them into distinct and visually appealing pieces.