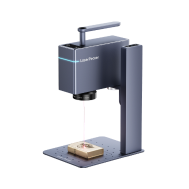


If you possess a basic understanding of our laser engraving and cutting machines, you might have likely discovered that our range of models is renowned for their exceptional portability, speed, efficiency, precision, beginner-friendly interfaces, and wide range of applications, thanks to our state-of-the-art technologies. It should come as no surprise that all these remarkable advantages cannot be achieved without the help of a diverse selection of excellent accessories available in our store.
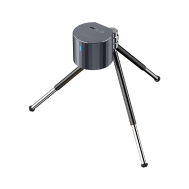
In this blog, we aim to introduce the amazing versatile electric roller, designed to match our laser engraving and cutting machines - the LP2 & LP3 models. This revolutionary accessory offers three distinct professional modes: Cylinder mode, Slab mode, and Trolley mode. Moreover, we will highlight a range of versatile options these modes provide users with to cater to different engraving needs, specifically focusing on expanding the working area and enabling flawless engraving on cylindrical objects. This comprehensive guide allows us to walk you through the purpose behind each mode and provide a step-by-step tutorial on how to make the most of this game-changing accessory.
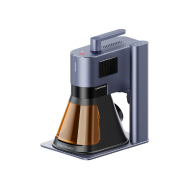
Cylinder Mode
When working with cylindrical objects, the Cylinder mode shines as it enables the laser engraver to seamlessly maneuver along the surface. Imagine engraving intricate designs on a stainless steel water bottle or personalizing your favorite ceramic mug with names and logos. The Cylinder mode ensures exceptional precision, allowing you to create awe-inspiring artworks on these unconventional flat canvases. Plus, we provide you with an easy-to-follow tutorial to master the art by utilizing the versatile electric roller:
Tutorials Steps: Mastering the Art of Cylinder Mode
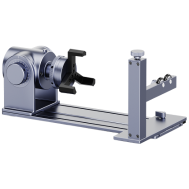
- Attach to laser head:
Use a USB cable to connect the power input port on the roller to the laser head. This ensures a power supply to the device.
- Attach to electric stand:
Use another USB cable to connect the power output port on the roller to the eclectic stand. Ensure that the connection indicator light on the electric stand is blue, indicating that it is working normally.
- Connect App via Bluetooth:
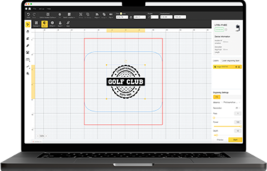
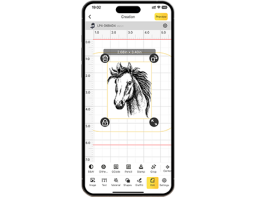
Open the LaserPecker App on your device and connect it to the corresponding LaserPecker machine via Bluetooth. This enables communication and control between the app and the laser engraver.
- Configure mode settings:
Click on the "Settings" icon within the LaserPecker App. Then, navigate to the “Mode Settings” and enable the “Versatile Electric Roller”. This setting allows you to use the cylinder mode functionality.
- Select a mode and adjust focal length:
Once the versatile electric roller is enabled, you will find the option to choose the cylinder mode. Select it and make sure to adjust the focal length according to the specifications of your LaserPecker model.
- Start the engraving process:
Proceed with the engraving process as you would with any other engraving job. Load your design, position the cylinder correctly, and start the engraving process.
Note: If you are engraving on a frictionless cylindrical object, it is recommended to wrap two silicone bands on both ends of the object. This prevents it from skidding from the roller during the engraving process, ensuring accuracy.
How to Get the Correct Focal Length for LP2:
When it comes to measuring the focal length, we have to mention that the distance between the laser outlet and the surface of the engraved object is required to be 110mm for the LP2 model. And there are three different ways that you can choose:
- Ruler:
Use the ruler provided in the basic package of the LaserPecker model. Measure the distance from the laser outlet to the surface of the engraved object using this ruler.
- Protective shield:
The protective shield included with the laser engraver basic package is designed to have a correct height of 11cm. To measure the focal length, place the bottom of the protective shield on the top of the object being engraved. Once they touch, the focal length is correct.
- L-shaped ruler:
The L-shaped ruler extends from the middle of the electric stand. To measure the focal length, position the bottom side of the ranging rod on the surface of the engraved object. Once they touch, the measurement is confirmed.
How to Get the Correct Focal Length for LP3:
We offer you the advanced focal point overlap technology to help you adjust the focal length with ease:
- Focal point overlap technology:
Adjust the distance between the laser outlet and the surface of the engraved object via the Up or Down button on the top of the electric stand or in the App. Once two red focal points overlap perfectly, the focal length is correct.
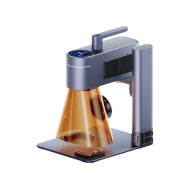
Slab Mode
Slab mode is ideal for larger flat objects, allowing objects to move forward for engraving. It bestows upon you the ability to embellish wooden planks and wooden signs with intricate details. Picture this: you're an avid member of a skateboard club, and what better way to show your personality than with a customized skateboard? Or perhaps your family has recently relocated to a new house, and you can't help but envision adorable names or heartfelt welcome messages engraved on wooden door plates, hung gracefully on each door.
It's important to note that the tutorial steps for using the slab mode mirror those of the cylinder mode mentioned earlier. Therefore, we strongly recommend following the aforementioned steps for guidance. Additionally, to ensure optimal balance for your object, we advise placing a magnetic slider on each side of the electric roller, effortlessly assisting you in achieving perfect equilibrium.
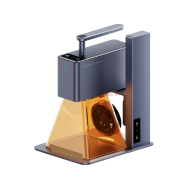
Trolley Mode
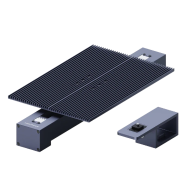
The Trolley mode of the versatile electric roller allows for engraving on large surfaces, such as intricate designs on wooden table sides, with an engraving size of up to 100*2,000 mm (3.9*78.7″) each time. This mode is designed specifically for creating exceptional masterpieces and adding intricate patterns to four sides of a wooden table.
Tutorials Steps: Mastering the Art of Trolley Mode
- Flip the roller over:
Flip the Versatile Electric Roller over to ensure it can run on the object for engraving.
- Attach to the laser head:
Pay attention to the different shapes of the nuts on each side of the riser add-on. Use the square-shaped nut to lock the laser head to the riser, and use the oval-shaped nut to lock the other side to the electric roller.
- Ensure power supply:
Link the laser head to the electric roller using a USB cable. Ensure that the connection indicator light on the electric stand is blue, indicating that it is working normally.
- Connect App via Bluetooth:
Connect your LaserPecker App to the corresponding device via Bluetooth.
- Configure mode settings:
Click on the "Settings" icon within the LaserPecker App. Then, navigate to the “Mode Settings” and enable the “Versatile Electric Roller”. This setting allows you to use the trolley mode functionality.
- Select trolley mode and adjust focal length:
Once the versatile electric roller is enabled, you will find the option to choose the trolley mode. Select it and make sure to adjust the focal length according to the specifications of your LaserPecker model.
- Start the engraving process:
After selecting the trolley mode and setting the appropriate focal length, you can proceed with the engraving process as you would with any other engraving job. Load your design, position the object correctly, and start the engraving process.
* Please note that the latter two modes mentioned in the description may not be applicable to our LP3 model at present.
Now that you have familiarized yourself with the capabilities of the versatile electric roller's three modes, get started exploring some exciting usage scenarios and unleash your creativity in crafting exquisite and awe-inspiring pieces now. Remember to subscribe to our official YouTube channel to stay updated on global trends and discover new and creative ideas.